How to Sew an Accurate Quarter Inch Seam for Quilting
Today's tutorial is how to sew an accurate quarter inch seam. You may ask why do another tutorial when there are so many good tutorials already out there in web land? First, when I make my quilt patterns available (stay tuned!) I want anyone using the patterns to be able find supporting information on my website. Second, I just love learning and sharing about quilting. I also find that teaching a topic is a great way to learn more myself.
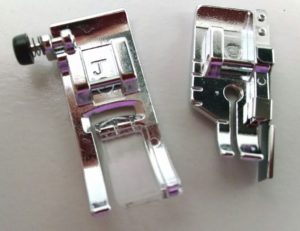
 General purpose foot and quarter inch foot
 Closeup of needle area showing various guide marks for seam allowances
What presser feet do you have available for piecing? I usually piece with my specialty quarter inch foot. It is designed to make a quarter inch seam when you feed the fabric edge along the guide on the side of the foot. If you don't have a quarter inch foot I recommend that you purchase one that fits your machine.
Sometimes I use my general purpose zigzag foot for piecing, especially if I am switching between kinds of sewing and I am too lazy to switch feet. There are stitch settings on my machine that make a quarter inch seam if the fabric is lined up with the edge of the general purpose presser foot.
Most machines also have markings on the needle plate and/or bobbin cover to serve as guides for different size seam allowances. You may need to read your manual to understand how to line up with the guide marks and which stitch settings to use. If your machine does not have any guide marks to follow you can experiment with your straight stitch and place a strip of painters tape on your machine to serve as a quarter inch guide. Know your machine, become one with your machine!
 For each test cut eight 1 1/2" x 4" strips from scrap fabric. It is important to cut your pieces as accurately as possible. After all you can't make accurate blocks if you don't start with accurate cutting. Sew the eight strips together on the long sides to create a panel. Press carefully after each piece is sewn.
How to Press Your Pieces
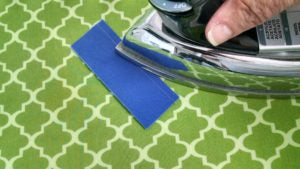
 First press the still closed seam to set the thread in the fabric.
 Then press open from the top making sure there is no extra fabric creased in the seam. Seam allowance underneath will roll toward the upper piece.
 Finally press flat by placing the iron across the whole top side.
 Strips sewn together into a panel to test 1/4" seam allowance
You will end up with a panel of eight strips. Why should you use eight for the test instead of just two or three? Because a small error in the seam allowance will add up across multiple seams and by measuring the whole panel you will be able to detect those small errors. The more seams there are in a quilt the more important it is to have an accurate seam allowance. Otherwise you will be gaining or losing something in every single seam which can easily add up to a half inch or more.
 First panel measures only 8 1/4"
The test panel should measure exactly 8 1/2 inches across. (One inch for each strip plus the seam allowances on the outside strips.) When I did this test using my general purpose foot I found the panel measured only 8 1/4 inches. No wonder my blocks seemed to be shrinking! What to do?
 This panel measures right on 8 1/2 inches
Every machine is different so you will need to consult your manual on how to adjust the needle position. Mine is adjusted by changing the stitch width. When you first make a change you should lower the needle by hand to make sure the needle is not going to hit outside the hole in the presser foot. Even if your machine can not make small adjustments in the needle position you can always make other adjustments. Maybe put down a strip of tape to be your guide and shift it until you are happy with the results of the test. There are many variables to consider - accurate cutting, accurate seam guide, careful pressing, and needle position. However with attention and practice you will soon be sewing practically perfect quarter inch seams.
I would love to hear your tips in the comments. Happy quilting!
-Sandy
Quarter Inch Seam
Sewing an accurate quarter inch seam is critical to making blocks square, matching points, and creating a quilt that lays flat and pretty. However many quilters have discovered that sewing an accurate quarter inch seam can be deceptively challenging.Know Your Machine
 General purpose foot and quarter inch foot
 Closeup of needle area showing various guide marks for seam allowances
Test Your Seam Allowance
Even if you are using a quarter inch guide it is quite possible that you are not sewing an accurate quarter inch seam. For example, on my new machine I noticed that my blocks were ending up small when I pieced with the general purpose foot. I measured my seam allowance on a piece and it looked good, but my blocks were shrinking and the overall quilt measurements were messed up. Time for a test!Cut Standard Test Strips
 For each test cut eight 1 1/2" x 4" strips from scrap fabric. It is important to cut your pieces as accurately as possible. After all you can't make accurate blocks if you don't start with accurate cutting. Sew the eight strips together on the long sides to create a panel. Press carefully after each piece is sewn.
How to Press Your Pieces
 First press the still closed seam to set the thread in the fabric.
 Then press open from the top making sure there is no extra fabric creased in the seam. Seam allowance underneath will roll toward the upper piece.
 Finally press flat by placing the iron across the whole top side.
Measure Your Panel
 Strips sewn together into a panel to test 1/4" seam allowance
 First panel measures only 8 1/4"
Adjust Until Your Seams Are Practically Perfect
Most machines have a way to adjust the needle position in small increments. So I moved my needle one increment to the right which made my seam allowance just a tiny bit smaller. I sewed another test panel using the same accurate cutting and careful pressing. This time my panel measured right on the 8 1/2 inch mark. Yay! Now I make sure that the needle position is adjusted correctly when I use the general purpose foot for piecing. This panel measures right on 8 1/2 inches