Pinwheel Coasters Scrap Piece Project (SPP)
Welcome to guest blogger Janette, quilting buddy and queen of scrappy projects ...
Scrap Piece Projects (SPPs)
SPPs are small, easy, and quick projects to use some of those leftover pieces of favorite fabrics from quilt projects. SPPs can have practical uses, be design touches around the home, be fun activities you can do with a youth learning to sew, and are excellent gifts for those “just a little something for you” occasions.Pinwheel Coasters
Fabric coasters are ideal for soaking up those sweating cold drink glasses and for protecting furnishings from hot beverage mugs. Larger sizes can be great for use under glass candles, flower vases and small potted plants on tables. The simple binding technique is used to make the corners as flat as possible. The pinwheel design is cheerful and hints motion. It’s one of the basic quilt block designs, and with a little trick, you can learn to make the center point flat.Size chart for cutting and trimming pieces, in inches.
| Coaster style | Final size coaster | 2 square pieces | Trim 4 half triangles squares | Trim pinwheel, cut batting | Back piece square |
| Glass | 4 ½ | 5 | 2 ½ | 4 ½ | 6 ¾ |
| Mug | 5 | 5 ½ | 3 | 5 | 7 ¼ |
| Candle | 5 ½ | 6 | 3 ½ | 5 ½ | 7 ¾ |
| Vase/plant | 6 | 6 ½ | 3 ½ | 6 | 8 ¼ |
Fabric requirements:
Reference size selection chart above for dimensions of your chosen style. Cut:- 2 square pieces of opposing fabric colors (1 light, 1 dark)
- 1 square back piece
- 1 square piece of batting
Assembly directions:
-
Put the 2 square pieces together RST, sew ¼” seam around all 4 sides. Cut across both diagonals (picture A).
 Picture A
-
Press each half-triangle square piece, towards the dark fabric (this will help with nesting of seams). Trim each half-triangle piece according to the chart (picture B). Hint: Use the diagonal seams to line up the square.
 Picture B
- Lay out the pinwheel, sew two row pieces together, nesting seams, careful to meet the triangle corners, press towards the darker fabric. Then sew the top row to bottom row, nesting seams and matching the inside points.
-
To make a flat center: while the seam is still closed, pick out 2-3 stitches from the two row seams, stopping at the last seam (picture C). Open the block to see the back side, peel the last seam open so you see a small pinwheel in the center (picture D), and last seam allowances lay facing dark fabrics. Press carefully on the back, flip over, and do a final press.
 Picture C
 Picture D
- Trim the pinwheel block to size in chart. Hint: use the diagonal seams to align the square edges.
-
Iron ½ inch hem around all 4 sides of the back square piece (picture E). Open the corners, and cut the small square made by the creases (picture F). On a table, layer the back fabric (right side down), batting, then pinwheel (right side up).
 Picture E
 Picture F
-
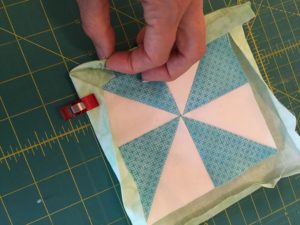
Folding the back to make binding: start in a corner, fold the open back fabric corner diagonally so the back fabric nests to the corner of the pinwheel, and the cut-out-square is on top of the pinwheel, about ½ inch in from each side (picture G). Fold one side along crease, then again to cover the pinwheel by ½ inch and cover the edge of the clipped corner square (picture H). The corner will make a mitered edge. Repeat with the other side, and clip the mitered corner together (picture I). Repeat this sequence for remaining corners and sides (picture J).
 Picture H
 Picture I
 Picture J
-
Sew around all sides, close to the inside edge of the binding. Ditch stitch the diagonals of the pinwheel to quilt the coaster (picture K).
 Picture K
Now admire your work with a cool drink!

